If you have come across this post it is likely that you have found yourself faced with a problem that most ASP.NET developers who use Visual Studio or Visual Studio Code eventually hit: the periodic expiration of the self-signed SSL certificate used for developing applications over HTTPS. In this article, after a first overview of the creation and operation of this certificate, we will see how to solve this problem.
Localhost self-signed SSL certificate
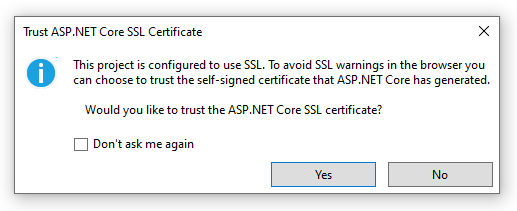
This certificate, as many of you probably already know, is automatically created by the development framework when an HTTPS web application is run for the first time: since this application is run on a local Web Server (usually IISExpress or Kestrel), the support of the HTTPS protocol requires the presence of a valid certificate for the local execution domain, which is localhost. For this reason, in the (very likely) case in which the development machine does not already have one, Visual Studio proposes the creation of a self-signed SSL certificate through a pop-up window similar to this one:
As the informative message in the popup says, creating and installing this certificate is not mandatory: however, if you choose not to do so, the browser - when connecting to the localhost endpoint on which the web application runs - will return the typical warning related to the absence of a valid SSL certificate, forcing us to click on "Continue anyway" and other inconvenient actions before we can run the content of our application.
For this reason, it is generally a good idea to create this self-signed SSL certificate, which will allow us to connect to our web application locally without any problem.
Unfortunately, SSL certificates have a limited duration in time: specifically, the self-signed certificates created by Visual Studio usually have a rather low duration (1-2 years): when the certificate expires, the warning message referred to above will forcefully return to make its appearance at every connection attempt by the browser.
In most cases this deadline does not create significant problems: Visual Studio will automatically notice that that certificate has expired and will create a new one (obviously asking once again for the user's consent). However, there is the possibility that the presence of the previous expired certificate - which in most cases is not deleted - confuses our browser, which will not be able to notice the presence of the new certificate and will therefore continue to refer to the previous one ... and then, as a consequence of this, to show us the annoying SSL certificate expired error message.
Delete expired SSL certificates
To solve this problem, the best way to go is to get rid of the expired certificates. In order to do that, simply carry out the following operations:
- Press the WIN + R keys, so that the Run window appears.
- Type mmc and press OK to launch the Microsoft Management Console tool.
- Once there, click on File > Add / Remove Snap-In
- Add the snap-in related to Certificates, choosing those related to the current user.
Right after that, you will be able to use the Action > Find Certificates feature to search for those issued by localhost, as shown in the following screenshot:
Once done, all we need to do is to delete the expired certificates (right click -> delete). Please be careful not to delete the ones that are still valid!
Clear the SSL Cache
Once the expired certificates have been deleted, it is advisable to clear the browser and system cache so that they are no longer used. To do this, simply perform the following operations:
- Open the Windows Control Panel.
- Select Internet Options.
- Select the Contents tab.
- Click the Clear SSL State button.
Regenerate the localhost SSL certificate
In case we need to recreate the development localhost SSL certificate from scratch, the simplest thing is to use the appropriate command provided by the dotnet CLI:
> dotnet dev-certs https --trust
Right after running this console command, a new development self-signed SSL certificate will be created: furthermore, the --trust switch will ensure that such certificate will also be registered as a trusted Certificate Authority, which will allow it to be recognized as valid by any browser.
Alternative method
Here's an alternative method that you can use if the previous one didn't work:
- Close all Visual Studio and browsers instances.
- Use Solution Explorer to navigate to %APPDATA%\ASP.NET\https and delete all files in this folder.
- Use Solution Explorer to navigate to C:\Users\%USERNAME%\AppData\Roaming\ASP.NET\https and delete all files in this folder.
- Open a command prompt and execute the following 3 commands:
- dotnet dev-certs https --clean
- dotnet dev-certs https --trust
- dotnet dev-certs https --check
Conclusions
That's it for now: we hope this guide will be useful for ASP.NET developers looking for information to solve the problem of an expired or invalid SSL certificate for their web applications.
Until next time!


