Table of Contents
This is not the first time we're talking about Mercurial, one of the best Distribuited Source Code Control Manager for Windows, also known as HG. In the unlikely chance you never heard about it, we strongly suggest reading its Wiki page and/or pay a visit to its official home page: in this post we'll briefly explain how to properly configure Visual Studio 2015 to effectively use Mercurial as main Scc Manager as a viable replacement (or worthy companion) to GIT, SVN or even the more-than-deprecated Visual SourceSafe.
Installing TortoiseHg
The first thing we need to do is installing TortoiseHg, a great freeware client to handle Mercurial repositories for all Windows platforms, including Windows Server 2012 and Windows 10. The installation packages, natively available for 32-bit and 64-bit Windows builds, are available free of charge from the project's official website.
Once installed, we'll get the chance to handle Mercurial repositories in two different ways:
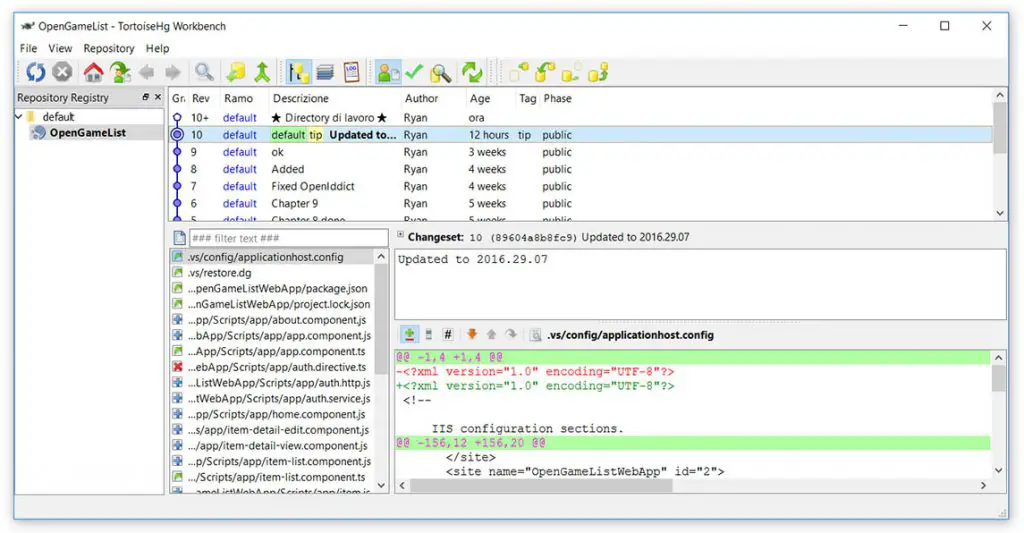
- Using the TortoiseHg GUI, better known as TortoiseHg Workbench, which can be accessed by clicking on the TortoiseHg program icon from the Start menu (see Image 1).
- Using the context add-ons added to the File context menu, available by right-clicking to any file or folder within an instance of the Windows File Explorer (see Image 2).

Either one of them can be useful, depending on any given scenario. For example, if you need to Clone an existing project in a matter of seconds, the context menu add-on will most likely be the right choice: all you need to do is right-click on the destination folder, select TortoiseHg > Clone... and enter the repository URL to start the cloning process. On the other hand, whenever we need to change some configuration settings, the TortoiseHg Workbench will be very handy, providing the proper GUI tools to do that: that's precisely what we need to do right now.
Configuring TortoiseHg
Before digging into Visual Studio 2015 it can be wise to change a couple things to the TortoiseHg 's default settings. Let's open up the TortoiseHg Workbench, then navigate through File > Settings: the TortoiseHg settings modal window will open. Navigate through the Sync section using the menu to the left. Once there, change the value of the Operation to perform after pull dropdown to Update. This way, every time the local repository will be updated with a synchronize/pull operation, Mercurial will also update the hard-disk version accordingly.
As soon as you do that, move to the Extensions section. We need to enable two very useful plug-ins here: hggit and mercurial_keyring. The former will make TortoiseHg able to handle Git repositories (such as those present on Github.com) by following the instructions explained here; the latter will enable a handy keyring to securely store the passwords for all the repositories being used, which can be very useful if you plan to do a lot of synchronization-type tasks (such as push, pull etc.) aginst Mercurial and/or Git remote servers.
Installing VisualHG
The time has come to launch Visual Studio 2015 and install the additional component that will enable us to use TortoiseHg right within the GUI. From the main menu, select Tools > Extensions and Updates: in the modal pop-up window that will open we'll have the chance to take a look to all the already installed extensions and/or add new ones. Select Online from the left menu to look for new extensions available online, then insert VisualHG in the top-right textbox: you should then be able to see the VisualHG extension, made by Bernd Schrader, which is the one we're looking for.
You can either install the VisualHG extension from the GUI or by downloading the .msi installation package from the project's official page published to the VisualStudioGallery web site.
Setting VisualHG as default Source Control Manager
Once VisualHG has been installed (you might also be asked to restart Visual Studio 2015) we need to set it as the default Source Control Manager for Visual Studio. From the main menu, select Tools > Options, then look for the Source Control section from the left menu: expand the node, select the Plug-in Selection window and pick VisualHG from the combo box.
Once done, a new Source Control context menu item will be available from Visual Studio's Solution Explorer: if we expand it, we can see that it contains all the most common Mercurial-related commands made available by TortoiseHg: Clone, Synchronize, Commit, File History and more. The extension also provides a very useful set of overlay icons that will show up to the right of each Solution Explorer's file or folder, depending on their status: in sync with the repository, modified & waiting for a commit, and so on.
A stand-alone alternative: HgSccPackage
In case the VisualHG and/or TortoiseHg interface won't be enough to suit our tastes, there's another alternative we can use to achieve - more or less - the same outcome: its name is HgSccPackage and, just like the previous one, it's another free extension for Visual Studio. The main difference between VisualHG and HgSccPackage is that the former is basically a Visual Studio GUI proxy for TortoiseHg, while the latter is a stand-alone piece of software: this can be a good thing, because we don't need to install TortoiseHg in order to make it work: however, we'll miss a lot of neat features of TortoiseHg, including the Git integration and the Keyring for storing our passwords in a reliable and secure way. The good news are that the Mercurial core features will still be there, as well as the overlay icons.
A bunch of nice features provided by HgSccPackage can be accessed by a modal pop-up windows that will show up upon clicking to the Options item (the very first context menu entry): we can choose the visual theme, set which diff tool to use (my favorite for Mercurial and Git is kdiff3 because of it's great 3-way visual compare feature), configure our BitBucket account for an easier access to BitBucket repos (if you don't know what it is, think of it like a GitHub for Mercurial users) and more.
The HgSccPackage can be installed using the Visual Studio's Extensions and Updates... GUI tool or by downloading the installation package from the project's official page on the VisualStudioGallery web site.
Needless to say, should we choose to adopt HgSccPackage instead of VisualHG, we will also need to set it as the default Source Code Control Manager: from the main menu, navigate through Tools > Options, select the Source Control section from the left-side menu, then pick Mercurial Source Control Package from the combo box.
Scc Auto Switcher
Before we're done, it's worth to suggest another useful tool: what if we use different Source Code Control Mangers (SVN, Git, Hg and maybe even more) for different projects? If that's the case, the Scc Auto Switcher extension by Francesco Pretto could save you an headache by automatically switching between the installed Scc Managers depending on the existing files and/or folders (svn, hg, git and so on) within the project's root.
Just like the others, the Scc Auto Switcher extension can either be installed from the Visual Studio GUI or by downloading the installation file from the project's official page on the VisualStudioGallery web site.
That's it for now: happy source code control!

