As most people probably notice, the .vmdk files created by VMware for Mac OS X Operating Systems tend to continuously grow as time passes by, getting bigger and bigger after each update.
Luckily enough, there's an easy fix that can be manually performed to reduce the vmdk file size. Here's how you can pull it off in two steps, the first one within the guest OS (the Mac OS X) and the latter on the hosting PC environment.
- Launch your guest OS X Virtual Machine.
- Open the Finder app and retrieve the actual name of the HDD you need to shrink (for example, "Macintosh").
- Open Terminal > Shell and issue the following command:
-
sudo diskutil secureErase freespace 0 Macintosh
- use su instead of sudo for Mac OS X 10.9 or lower.
- if you receive a "Macintosh HD not found" error, open the Finder app again and be sure that the HDD name matches the one you wrote.
-
sudo diskutil secureErase freespace 0 Macintosh
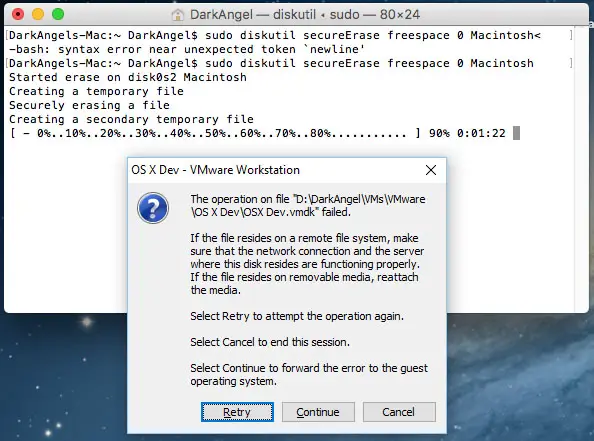
- Wait for the command to terminate its task: be warned that it will probably require some time (10+ minutes or more), depending on the current vmdk disk size and the performance of the hosting machine's storage unit. It's worth noting that when it comes around 90 percent a VMware error popup could possibly appear, which you can safely ignore (by hitting the Continue button) as long as it will continue the task up to completion.
- Once done, shutdown the Mac OS X VM - be sure to do that!
- On your main/hosting PC, open a Command Prompt (or Terminal > Shell) with elevated priviledges and type the following command:
-
\VMware-Path\vmware-vdiskmanager.exe -k \VM-Path\VM-name.vmdk
- (replace VMware-path with the path of VMware installation folder and VM-path with the path of the .vmdk file to shrink).
-
\VMware-Path\vmware-vdiskmanager.exe -k \VM-Path\VM-name.vmdk
The last operation can take some time (30+ minutes), but as soon as it's done your .vmdk file will be shrinked down to its real and correct size, possibly saving up GBs of space!
Here are some screenshots showing the whole process: the first command on the Guest OS (Mac OS X Sierra):
The 90% VMware error message that you can safely ignore by hitting Continue:
And the command to be issued within the Hosting OS (Windows 10):
That's it! I sincerely hope that this procedure will help those who are struggling with this nasty issue, until VMware will implement the option to automatically perform such task.


