Table of Contents
If you've stumbled upon this post, it most likely means that you're looking for a way to free some reasonable amount of disk space on a CentOS 7 machine.
In this article I'll try to summarize some easy techniques that can be easily pulled off using the command-line / terminal to fullfill such task; each command has been tested on a CentOS 7 machine, but most of them will also work on any other Linux environment.
Show free disk space
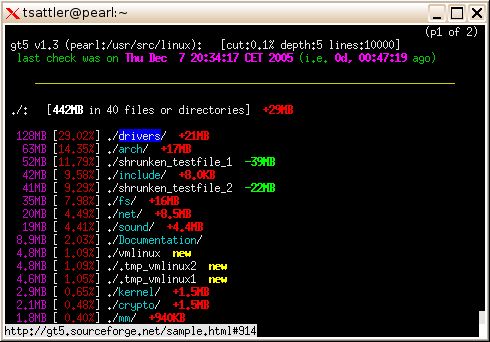
The first thing to do is to check how much free disk space we do have on our CentOS drive. There are a lot of useful tools that can do that, the best one of them arguably being gt5 - a freeware terminal utility that shows the available disk space using a neat colored interface:
If you want to use gt5, you can download it from here.
If you don't want to install an additional package, you can also use the built-in df system utility - which is already included in CentOS - and obtain a similar result using the following command:
|
1 |
df -h |
Which should return the following info:
Now we know how much disk space we do have: in the above screenshot, we can see how the situation is quite troublesome, since we do have only 4.3 free MB left.
Install yum-utils
The next thing to do is to install the yum-utils package using the following command:
|
1 |
yum install yum-utils |
This package consists of a collection of utilities that integrate with yum to extend its native features in several ways, thus making it more powerful and easier to use.
In the unlikely case we do not have the required amount of disk space to perform the install of yum-utils, the best thing we can do is to manually delete some log file from the /var/log folder: luckily enough the package is quite small, therefore a couple log files (for a total amount of ~1-2 MB) should do the trick.
Trim log files
Now we can start to clean up our system. Let's start with the following command, that will truncate all the log files on the /var/ folder that are either older than 7 days and greater than 50M or older than 30 days.
|
1 |
find /var -name "*.log" \( \( -size +50M -mtime +7 \) -o -mtime +30 \) -exec truncate {} --size 0 \; |
Right after doing that, it could be useful to repeat the gt5 or df -h command to see how much disk space we've recovered.
Clean up YUM cache
The next thing we should do is to cleanup our YUM cache with the following command:
|
1 |
yum clean all |
Unfortunately, the above command don't always remove everything, therefore it can be useful to also perform a direct cleanup of the main YUM cache folder:
|
1 |
rm -rf /var/cache/yum |
And also the YUM user-cache folder:
|
1 |
rm -rf /var/tmp/yum-* |
Again, once we've done that, we should repeat the gt5 or df -h command to see how much disk space we've recovered.
Remove orphan packages
The next thing to do is to check the installed orphan packages to see if we can safely remove them; by orphaned packages we mean all packages which no longer serve a purpose of package dependencies.
Here's how we can safely see the orphan packages we do have on our system:
|
1 |
package-cleanup --quiet --leaves --exclude-bin |
And here's how we can delete them:
|
1 |
package-cleanup --quiet --leaves --exclude-bin | xargs yum remove -y |
The above commands should be launched multiple times, because the packages deleted with the first batch could create additional orphan packages, and so on: be sure to perform these tasks until no orphan packages appear anymore after the first package-cleanup command.
Remove WP CLI cached WordPress downloads
If the CentOS machine you're cleaning is a Web Server hosting one or more WordPress instances, you might want to clean the WordPress CLI cache as well. WordPress CLI saves WordPress archives every time you setup a new WordPress website: these archives can be removed with the following commands:
|
1 2 |
rm -rf /root/.wp-cli/cache/* rm -rf /home/*/.wp-cli/cache/* |
Remove old kernels
Whenever you update your CentOS kernel, the old kernel gets backupped by the system for safety reasons: however, you rarely need all of them. Here's a useful command that can be used to only keep the 2 latest kernels installed, thus removing the previous ones:
|
1 |
package-cleanup --oldkernels --count=2 |
This command should hopefully recover a good amount of disk space, as shown in the following screenshot.
Remove Composer cache
Again, if your CentOS machine is a web server, it could be useful to cleanup the Composer cache. Composer is an application-level package manager for the PHP programming language that provides a standard format for managing dependencies of PHP software and required libraries; every time we use it, it creates a cache of previous packages that can be safely removed to free up some disk space with the following commands:
|
1 2 |
rm -rf /root/.composer/cache rm -rf /home/*/.composer/cache |
Conclusions
That's it: I sincerely hope that the above commands will help you to cleanup your CentOS drive and free some disk space. If you have additional general-purpose suggestions that can be used fo fullfill such task, feel free to describe them in the comments section: we'll be happy to add them to this post!


