In this article I will briefly explain how to implement the IEMailSender interface using MailKit, which will allow any ASP.NET Web Application to send e-mail messages using any SMTP server.
For those who don't know what the IEmailSender interface and MailKit are, here's a brief explanation to better understand what are we talking about:
- The IEmailSender interface is a set of ASP.NET native API that fully supports the ASP.NET Core Identity default UI infrastructure: such interface can be implemented by creating a custom EMailSender class that can be used within the Web Application to asynchronously send e-mail message in a structured, transparent and consistent way. For additional info, check out the IEmailSender interface official documentation and/or the Microsoft.AspNetCore.Identity.UI.Services namespace reference.
- MailKit is an Open Source cross-platform .NET mail-client library based on MimeKit and optimized for mobile devices that allows to connect to SMTP server and send e-mail messages: for further details about it, check out its product page on NuGet.
In a nutshell, what we're about to do is to implement the IEmailSender interface using MailKit, so that we can use the native infrastructure to seamlessly send e-mail messages through the SMTP server of our choice. Are we ready? Let's start!
1. Installing MailKit
The first thing we need to do is to install the MailKit NuGet package, which can be done in the following ways:
- Using the .NET Core CLI, with the dotnet add package MailKit console command from the ASP.NET Core project's root folder.
- Using the Visual Studio Package Manager Console, by typing Install-Package MailKit in the Package Manager window panel: if such panel is not already present in the default GUI it can be made accessible from the main menu (View > Other Windows > Package Manager Console).
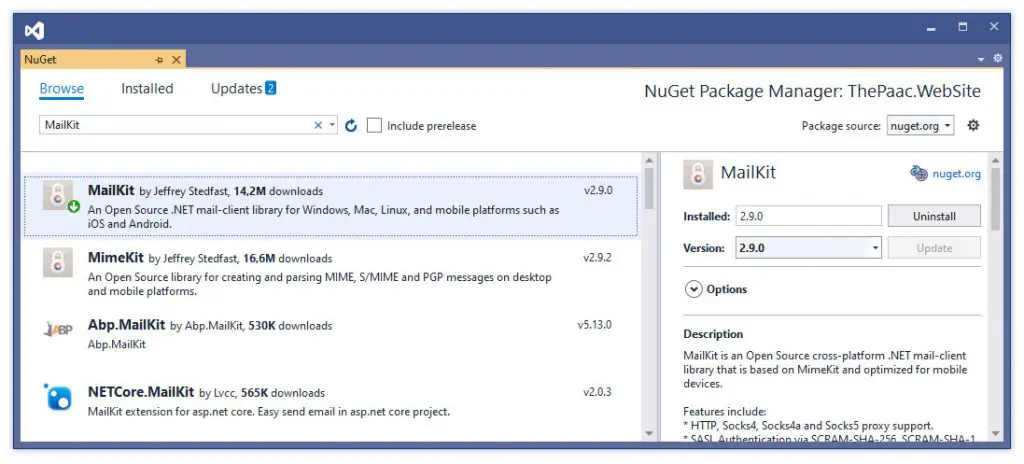
- Using the Visual Sutdio Package Manager GUI (from Solution Explorer, right-click to the project's root node and then select the Manage NuGet Packages option), as shown in the screenshot below.
Once MailKit has been installed, we can move on to the next step.
2. Creating a TOptions class
If we don't want to "hardcode" the various required parameters to connect to the SMTP server (server name, protocol, credentials, and so on), we need to find a way to provide them to our IMailSender interface implementation: the most effective way to do that is by leveraging the ASP.NET Core options pattern with a custom options class specifically made to host MailKit required variables, which we'll call MailKitEmailSenderOptions.
Here's how we can do that:
|
1 2 3 4 5 6 7 8 9 10 11 12 13 14 15 16 17 18 19 20 21 22 |
using MailKit.Security; public class MailKitEmailSenderOptions { public MailKitEmailSenderOptions() { Host_SecureSocketOptions = SecureSocketOptions.Auto; } public string Host_Address { get; set; } public int Host_Port { get; set; } public string Host_Username { get; set; } public string Host_Password { get; set; } public SecureSocketOptions Host_SecureSocketOptions { get; set; } public string Sender_EMail { get; set; } public string Sender_Name { get; set; } } |
Needless to say, this is only a small example including the required stuff: we're free to add further properties if we need to configure additional parameters of our SMTP and/or e-mail message.
3. Implementing the MailKitEmailSender
Now that we can rely upon a configurable set of options we can implement the MailKitEmailSender class, which is the most important part of our work:
|
1 2 3 4 5 6 7 8 9 10 11 12 13 14 15 16 17 18 19 20 21 22 23 24 25 26 27 28 29 30 31 32 33 34 35 36 37 38 39 40 41 42 43 44 45 |
using MailKit.Net.Smtp; using Microsoft.AspNetCore.Identity.UI.Services; using Microsoft.Extensions.Options; using MimeKit; using MimeKit.Text; using System.Threading.Tasks; public class MailKitEmailSender : IEmailSender { public MailKitEmailSender(IOptions<MailKitEmailSenderOptions> options) { this.Options = options.Value; } public MailKitEmailSenderOptions Options { get; set; } public Task SendEmailAsync(string email, string subject, string message) { return Execute(email, subject, message); } public Task Execute(string to, string subject, string message) { // create message var email = new MimeMessage(); email.Sender = MailboxAddress.Parse(Options.Sender_EMail); if (!string.IsNullOrEmpty(Options.Sender_Name)) email.Sender.Name = Options.Sender_Name; email.From.Add(email.Sender); email.To.Add(MailboxAddress.Parse(to)); email.Subject = subject; email.Body = new TextPart(TextFormat.Html) { Text = message }; // send email using (var smtp = new SmtpClient()) { smtp.Connect(Options.Host_Address, Options.Host_Port, Options.Host_SecureSocketOptions); smtp.Authenticate(Options.Host_Username, Options.Host_Password); smtp.Send(email); smtp.Disconnect(true); } return Task.FromResult(true); } } |
As we can see by looking at the above code, the class makes an extensive use of the MailKit NuGet Package to perform the SMTP connection and to actually send the e-mail message, taking all the required option from the MailKitEmailSenderOptions class and from the SendEmailAsync() method parameters.
4. Adding the MailKitEmailSender to the pipeline
Now that we have our very own MailKitEmailSender class, we need to add it to the web application's pipeline. This can be done by editing the Startup.cs file and adding the following statement block to the ConfigureServices() method:
|
1 2 3 4 5 6 7 8 9 10 |
services.AddTransient<IEmailSender, MailKitEmailSender>(); services.Configure<MailKitEmailSenderOptions>(options => { options.Host_Address = "my-smtp-server"; options.Host_Port = 587; options.Host_Username = "my-smtp-username"; options.Host_Password = "my-smtp-password"; options.Sender_Name = "My Sender Name"; }); |
This will make our web application aware of our custom EmailSender class during the startup phase and allow us to instantiate it in our Controllers using Dependency Injection.
Configure the SMTP settings from appsettings.json
In case you don't want to hardcode such values in the Startup.cs class - which would be quite undesiderable for a number of good reasons - you can define the SMTP settings in the appsettings.json file instead:
|
1 2 3 4 5 6 7 8 9 10 11 12 |
"ExternalProviders": { "MailKit": { "SMTP": { "Address": "my-smtp.server.com", "Port": "465", "Account": "my-smtp-username", "Password": "my-smtp-password", "SenderName": "My Sender Name" } } } |
And then reference them to the Startup.cs class in the following way:
|
1 2 3 4 5 6 7 8 9 10 |
services.AddTransient<IEmailSender, MailKitEmailSender>(); services.Configure<MailKitEmailSenderOptions>(options => { options.Host_Address = Configuration["ExternalProviders:MailKit:SMTP:Address"]; options.Host_Port = Convert.ToInt32(Configuration["ExternalProviders:MailKit:SMTP:Port"]); options.Host_Username = Configuration["ExternalProviders:MailKit:SMTP:Account"]; options.Host_Password = Configuration["ExternalProviders:MailKit:SMTP:Password"]; options.Sender_EMail = Configuration["ExternalProviders:MailKit:SMTP:SenderEmail"]; options.Sender_Name = Configuration["ExternalProviders:MailKit:SMTP:SenderName"]; }); |
5. Sending the E-Mail message
Now that we've done all the required stuff, we just need to actually send a email message through our application. This can be done from any controller in the following way:
|
1 2 3 4 5 6 7 8 9 10 11 12 13 14 15 16 17 |
public SampleController : Controller { public IEmailSender EmailSender { get; set; } public RegisterController(IEmailSender emailSender) { EmailSender = emailSender; } public async Task<IActionResult> Send(string toAddress) { var subject = "sample subject"; var body = "sample body"; await EmailSender.SendEmailAsync(toAddress, subject, body); return View(); } } |
As we can see, we're accessing a IEmailSender instance through Dependency Injection in the SampleController'sconstructor, and then use it in the SendMail() action method below: such instance will be instantiated using the MailKitEmailSender implementation which we've added to the pipeline.
Conclusion
That's it, at least for the time being: I hope that this small tutorial will help other ASP.NET Core developers to implement their own MailKit-based EmailSender and send e-mail messages with ease!


Hi Ryan,
Thanks for the great article! I’ve just implemented the mailer following your code and it works perfectly. I would suggest a couple of improvements to the code though:
(Minor fix) MailKitEmailSenderOptions class should not implement IOptions interface. Technically, it even can’t, since IOptions is a parametrized interface, so it just won’t work this way. Changing line 2 of MailKitEmailSenderOptions.cs to simple
public class MailKitEmailSenderOptions
works well.
(Nitpicking) using MailKit.Security; is not needed in MailKitEmailSender.cs
(Suggestion) As you mentioned yourself in part 2, hardcoding the configuration values is not a good way to go. Thus, I’d go one step further and instead of putting the configuration values into Startup.cs, I’d move to them to appsettings[.Development].json. While this might be slightly out of topic for this article, it won’t require much code changes, namely:
Inject IConfiguration into Startup class, like this:
…
public Startup(IConfiguration configuration)
{
Configuration = configuration;
}
…
change the options reading code to e.g.
And, finally, adding the actual configuration values to appsettings[.Development].json:
{
“Logging”: {
…
}
},
“SMTPSettings”: {
“HostAddress”: “my-smtp-server”,
“HostPort”: 587,
“HostUsername”: “my-smtp-username”,
“HostPassword”: “my-smtp-password”,
“SenderEmail”: “[email protected]”,
“SenderName”: “My Sender Name”
}
}
Hi Sergey,
thanks a lot for your feedback! We’ve implemented all your suggestions in our post, which now looks even better :) However, we’ve also added an updated MailKit configuration technique that used the NETCore.MailKit NuGet package to achieve the same results in a faster and easier (albeit less configurable) way:
https://www.ryadel.com/en/asp-net-core-send-email-messages-smtp-netcore-mailkit/
That’s definitely a recommended approach for most scenarios, hence we strongly suggest you to read that as well.
Thanks again,
I’ve checked it out now – looks great indeed and requires much less boilerplate. Thanks for that second post!
Beautiful. Just wanted to say thanks for the post. You explained IEmailSender integration for me.
Thank you so much for the positive feedback! If you like our posts, feel free to follow us on our social networks :)
Good article, thanks!
FWIW, I think I’m going to go with the linked article (ASP.NET Core C# – Send email messages via SMTP using NETCore.MailKit) since according to the official docs for
IEmailSender: