Dealing with .NET Core projects in Visual Studio can be tricky, expecially if you've installed multiple versions of the SDK and Runtime in your development environment. Among the many issues you can stumble upon, there are the following ones:
"Microsoft.NET.Sdk.Web" is missing
or
"Microsoft.NET.Sdk.Web" specified could not be found
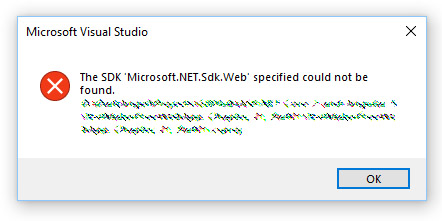
The above error messages will most likely be shown within a pop-up error message that will appear as soon as you try to load/reload a .NET Core project contained in a Visual Studio 2017 solution:
There are a number of causes that could cause this, the most common ones being the following:
- You copied, download or GIT-cloned a project from one computer to another.
- You opened a .NET Core solution file created with a previous version/build of Visual Studio or before updating your local Visual Studio installation.
- You installed a newer version of the .NET Core Runtime and/or SDK (or uninstalled a previous one).
- You messed up with your PATH environment variable(s)
... And so on.
Luckily enough, there are a number of things that can be done to fix that problem for good: let's see what can we do.
Install the right .NET Core SDK
The first thing to do is to be sure that the right .NET Core SDK and/or Runtime are installed on your system: the most recent builds and versions can be found on the official .NET Core downloads page.
Notice that the .NET Core Runtime alone is only needed if you want to be able to run the executable only: if you require to actively build the production using VS2017 you will need to get the SDK, which does also include the Runtime. Also, if you're looking to run a specific project developed and built with a specific version of the SDK/Runtime, be sure to get and install it: conversely, if you're doing that for your own solutions, getting the latest version is highly recommended - you will patch your local project files accordingly.
As soon as you've installed the required (or latest) .NET Core SDK and/or Runtime, try to launch your solution file again and see if the issue is gone before proceeding.
Clean-up obsolete .NET Core versions
Having multiple .NET Core Runtimes, SDK and Tooling sets installed might prevent Visual Studio from working properly for a number of reasons: wrong paths, outdated references/project/solution files, and so on. To prevent these kind of issues, you should always be sure to uninstall the .NET Core versions/builds which you don't require anymore from your development machine.
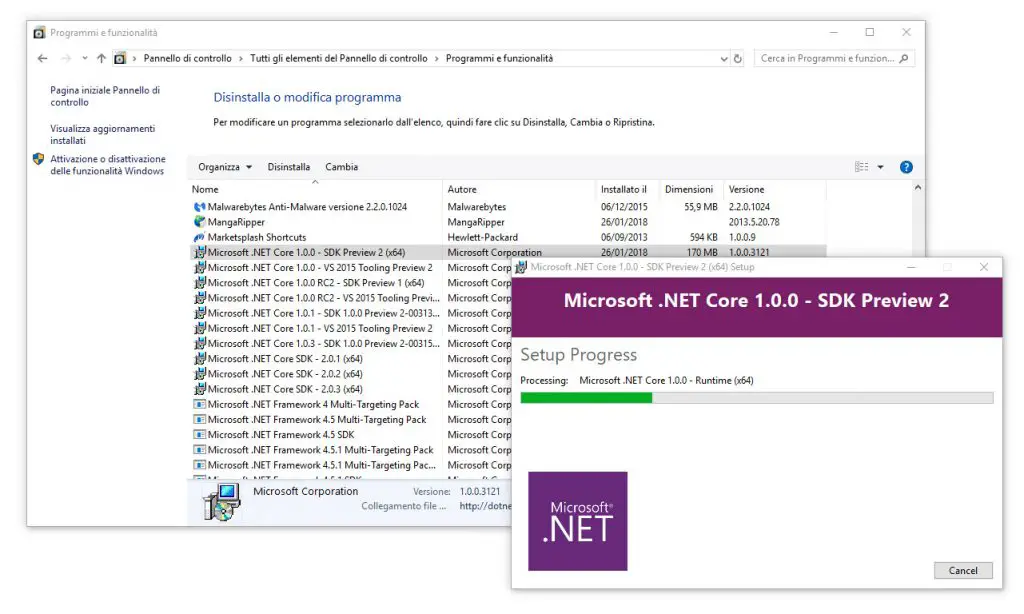
The best way to do that is to use the good old Control Panel > Programs and Features panel (or Uninstall a Program if your Control Panel is in the category view). If you're a .NET Core developer from day-one there's a good chance that it will require some time, as there will be a considerable amount of entries you'll want to get rid of:
It's worth noting that you should only uninstall the SDK and Runtime versions/builds you're sure you don't need anymore. If you're a .NET Core developer, there's a good chance that you might want to keep multiple SDK on your machine to be able to run/compile different projects/solutions... Just be sure to get rid of anything that you're sure you don't need anymore, as that will greatly help Visual Studio - and your environment's .NET Core versioning system in general.
IMPORTANT: While looking at the installed versions/builds, it's worth checking that you don't have a runtime conflict between the 32-bit Runtime and the 64-bit SDK or vice-versa: if that's the case, try to uninstall one of them as explained above, or install the same SDK version for 32-bit and 64-bit.
As soon as you've uninstalled everything you need to, check again your solution file again: if the original issue is still there, hop on to the next step(s).
Create a Global.json file
The global.json file has been introduced in may 2017 to allow selection of the .NET Core tools version being used through the sdk property.
The .NET Core CLI tools look for this file in the current working directory (which isn't necessarily the same as the project directory) or one of its parent directories. This basically means that, when you run dotnet new or dotnet build, the dotnet host will look in the current folder - and all parent folders up to the drive's root - for a global.json file and act accordingly:
- If a global.json file is found (and the SDK version it references is installed), then that version will be used for all SDK commands.
- If it can't find one, it will just use the newest version of the SDK installed on the machine.
It's worth noting that, back in the day, the global.json file was also used to define the source code folders for a solution, but that functionality was removed with the 1.0.0 SDK. The current file has now a very simple schema, that simply defines which version of the SDK to use:
|
1 2 3 4 5 |
{ "sdk": { "version": "2.0.5" } } |
For further info regarding the global.json file, read the official MS docs.
Rename the SDK reference
According to this StackOverflow answer, renaming the Microsoft.NET.Sdk.web reference to Microsoft.NET.Sdk within the project file might fix the issue, at least in some scenarios. To do that, open your .proj file and replace <project sdk="Microsoft.NET.Sdk.web"> with <project sdk="Microsoft.NET.Sdk"> .
Add the MSBuildSDKsPath Environment Variable
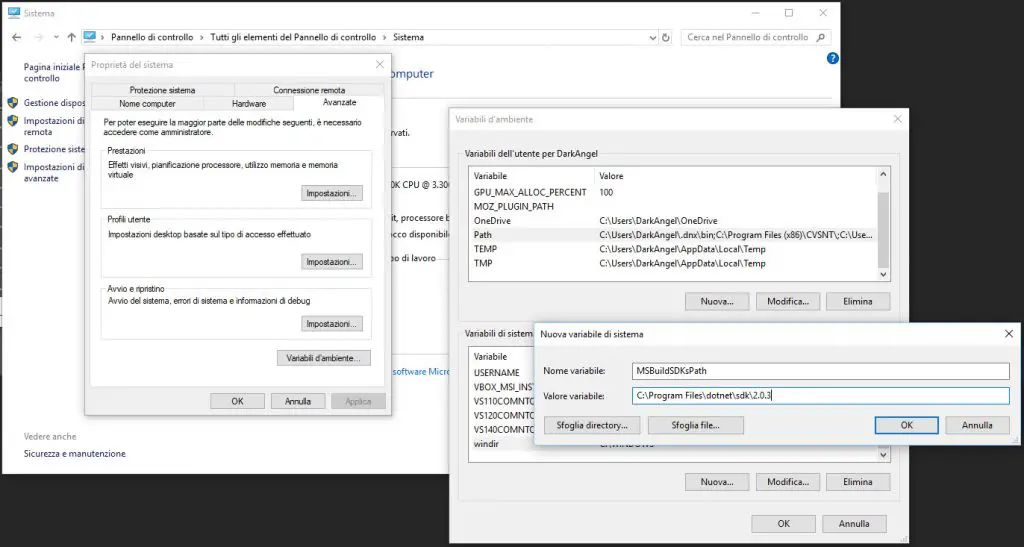
If all the above methods don't work, you can try with setting the MSBuildSDKsPath Environment Variable pointing to the required (or latest) .NET Core SDK. In order to do that, open the Windows Control Panel, then select System and go to the Advanced settings in the following way:
As a matter of fact, the dotnet CLI sets the MSBuildSDKsPath environment variable when invoking MSBuild: however, a December 2016 patch changed the CLI behaviour so that it will respect an existing environment variable, if it has already been set: this will allow the developer to "force" the CLI to use a specific SDK.
Check your PATH
It seems that sometimes installing the .NET Core 2.0 SDK will cause issues with the PATH environment variable: verify that both C:\Program Files\dotnet and C:\Program Files (x86)\dotnet are in the PATH environment variable.


What I have the experience is:
Check NET SDK installed on your setting. Not only installing version 64x, but version 86x.
EX:
.NET SDKs installed:
3.1.426 [C:\Program Files (x86)\dotnet\sdk]
6.0.405 [C:\Program Files (x86)\dotnet\sdk]
7.0.102 [C:\Program Files (x86)\dotnet\sdk]
(if there is no above three line, VS 2022 will not work normally whether below lines installed)
.NET runtimes installed:
Microsoft.AspNetCore.App 3.1.32 [C:\Program Files (x86)\dotnet\shared\Microsoft.AspNetCore.App]
Microsoft.AspNetCore.App 6.0.13 [C:\Program Files (x86)\dotnet\shared\Microsoft.AspNetCore.App]
Microsoft.AspNetCore.App 7.0.2 [C:\Program Files (x86)\dotnet\shared\Microsoft.AspNetCore.App]
Microsoft.NETCore.App 3.1.32 [C:\Program Files (x86)\dotnet\shared\Microsoft.NETCore.App]
Microsoft.NETCore.App 5.0.17 [C:\Program Files (x86)\dotnet\shared\Microsoft.NETCore.App]
Microsoft.NETCore.App 6.0.13 [C:\Program Files (x86)\dotnet\shared\Microsoft.NETCore.App]
Microsoft.NETCore.App 7.0.2 [C:\Program Files (x86)\dotnet\shared\Microsoft.NETCore.App]
Microsoft.WindowsDesktop.App 3.1.32 [C:\Program Files (x86)\dotnet\shared\Microsoft.WindowsDesktop.App]
Microsoft.WindowsDesktop.App 5.0.17 [C:\Program Files (x86)\dotnet\shared\Microsoft.WindowsDesktop.App]
Microsoft.WindowsDesktop.App 6.0.13 [C:\Program Files (x86)\dotnet\shared\Microsoft.WindowsDesktop.App]
Microsoft.WindowsDesktop.App 7.0.2 [C:\Program Files (x86)\dotnet\shared\Microsoft.WindowsDesktop.App]
For reference.
Thanks,